Here's how I made mine:
Draw a circle pattern (I used a 4" circle, which made a small pin cushion).
Cut out two circles:

Sew them together, and then zigzag around sewing*, leaving a small opening to turn:

Turn, stuff, and sew opening shut.
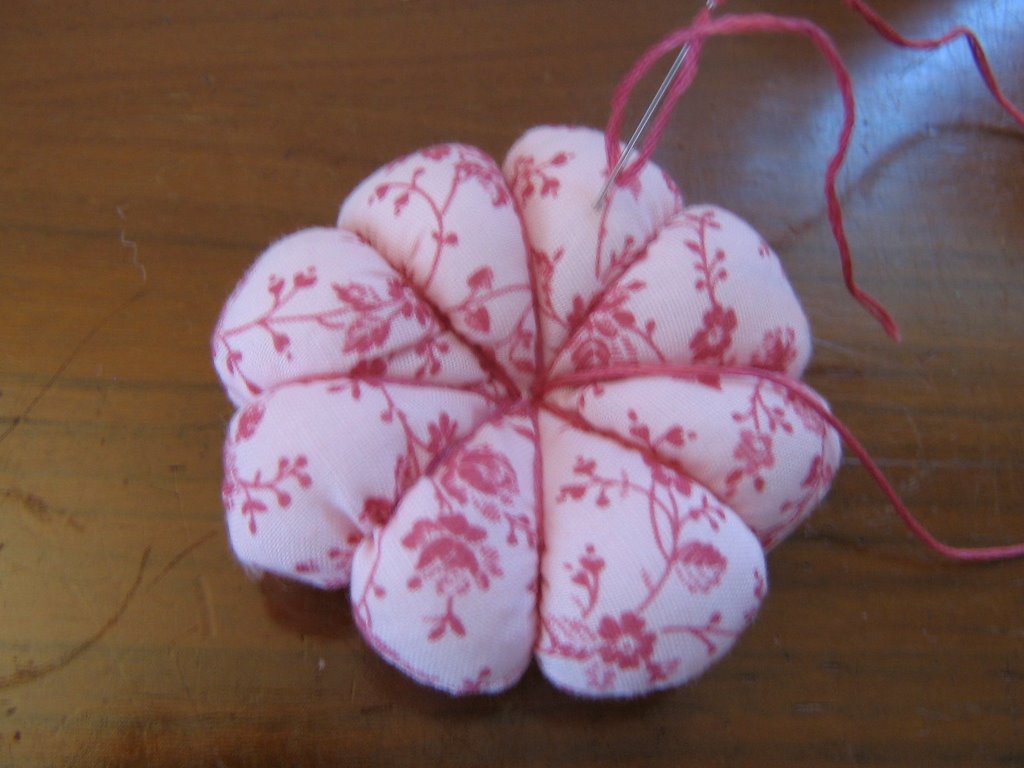
Using embroidery thread, and starting from center, form petals by pulling stitching firm:
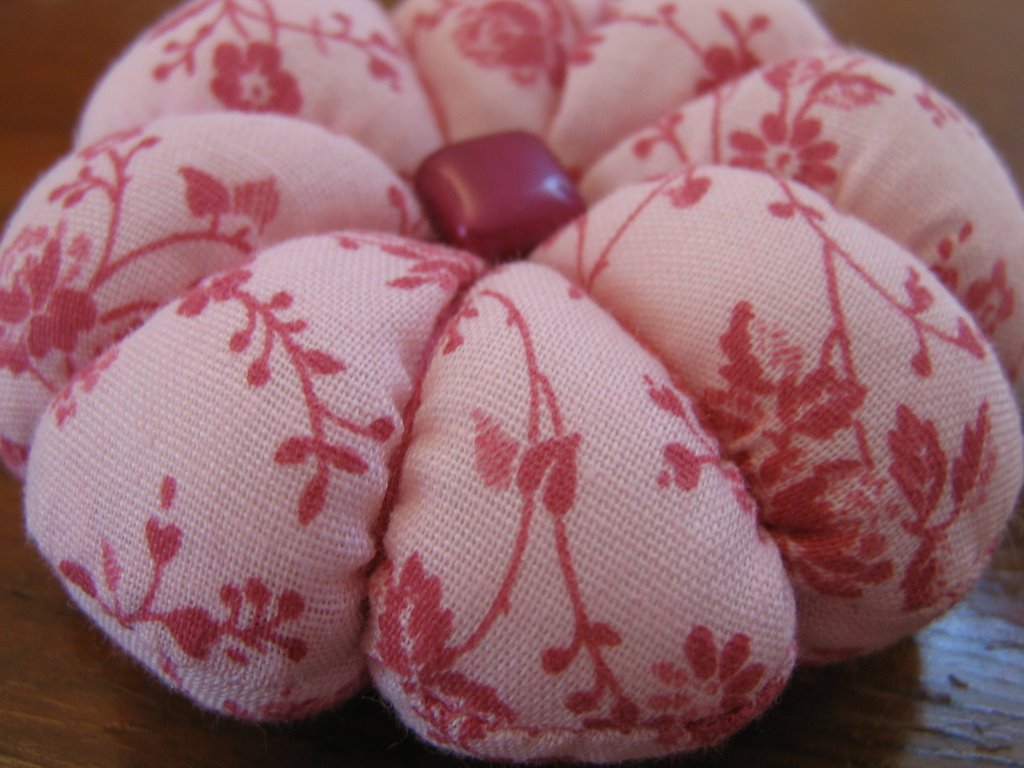
Sew a button in the middle. All done!
*If you zig zag around the seam, there is no need to clip the edge. This same little trick works wonders with collars, neck edges, and anything that is curved. Simply stitch, zig zag close to seam, and then trim close to zig zag edge.
55 comments:
Oooooh, very pretty, Tammy!
That is cute and a half. It looks simple enough for even me!!
Since I do not possess a sewing machine....does that zig zag trick work if you're doing it by hand? That is probably a stupid question, but that's about my speed when it comes to needles and thread.
Anne, I don't think I would attempt to sew zig zag by hand. If I were sewing it by hand, I would stitch tiny stitches close together, and then clip it, but not quite to the seam.
Very cute!! My daughter and I will have to make one. Thanks for sharing.
You did a lovely job - I love the fabric you chose for this.
Hmmmmm... easier said than done. I can't even sew a straight line!!! (something I want to learn before we bring our baby home!!!).
It is ABSOLUTELY adorable!!!! I really like your blog, Tammy!
His,
Mrs. U
So cute!
Oh, goodie! A project I think I can do!
...great job on the pin cushion!-thanks for the extra tip...
Oh yours looks great!
Very nice.
Did you just stuff it with Fiber Fill???? I think I might do this for gifts for our ladies tea at church.
Lela, yes, I stuffed it with fiberfill.
C'est très joli, j'aime beaucoup.
how sweet! and thanks for the zigzag tip.
-eleny
Thanks for this idea Tammy. I've just started sewing with my four daughters. We come to you sight often looking for ideas. We are very excited about the flower.
good evening I'm a french woman and I would likre to say to you
THANK YOU VERY MUCH FR THIS TUTO
I've just translate in French and I'll put it on my blog tomorrow in the afternoon !!!
thank you again for all
I'm sorry my english is so bad ! stéphanie
Great! Thanks for this tutorial!
Miss Boule
www.lab54.com/fabrik
Great idea. I can make several and attach to packages as little extras!! Also, as I kept looking at the photos, I could picture it as an orange pumpkin. Might just have to try that one, too. Thanks for the instructions.
Thank you for posting this. I made one tonight. Here's my take on it. http://www.flickr.com/photos/ladybean73/2270567824/
LaBean, I like the fabric you used. Thanks for sharing your pic with me. :-)
Cute lil' pincushion! I really love it. TFS
Hi Tammy, This pincushion is so cute. I am telling my friends about your blog. Thank you for posting it.
God Bless You
Carol
Such a cute little pin cushion! How do you attach the embroidery floss on the underside? Thanks!
Thank you for this adorable pattern. My best friend loves red so I made her a flower pin-cushion from beige fabric with tiny red stars on it, red embroidery floss, and even found a small red star button. It turned out great and she was thrilled with it. I plan to make many more for family and friends. Thanks for the inspiration.
Oh thank you - I have been looking for a pincushion pattern that I can manage (rather amateur seamstress, me) and I think this may be the one! So simple yet so stunning.
Tammy I love your little flower pincushion Last year I used the same method to make tomato pincushion Only difference was I used plain red fabric and green thread for the divisions and added a stem and leaves They were for a fund- raiser and were the first things sold out on the day
Cheers Marietza Anne
The pin cushion is beautiful! I am going to make one. Thanks for the tutorial.
I made one! http://www.flickr.com/photos/10300993@N04/2880828145/
Thanks for the tutorial.
Excellent tutorial!! Thanks!
Tammy, the pincushion is VERY CUTE!
THANKS for sharing, it is so darling.
Tammy, Thanks so much for sharing how to make this adorable pin cushion! I've been wondering they were made.
Happy Hoildays!
~Mary~ IsabellasCloset
Thanks Tammy
This is great and very easy for a newbie like me to follow i plan on making this soon.
i love the pin cushion.
what is the seam allowance?
Such a helpful tutorial! Thanks Tammy!
The seam allowance is 1/4".
Thank you for posting this great tutorial! It will come in handy!
Thank you so much for the cut pincushion idea, seems that at age 52 i am just waking up and really having fun learning new crafts and hobbies and enjoying the girl times. Going to make this with my 11 year old granddaughter. thanks so much!
Timeless piece ! I just made one and love it. Thank you so much for sharing this with all of us.
Thanks for all the lovely comments! Happy sewing!
hola gracias por compartir voy a tomar la idea y tratar de hacerla saludos
Ooh!! Thanks! I've ALWAYS wanted to know how to do this!
What did you use to stuff your pincushion? Thanks!
Kelly D. ~ dkad23(at)gmail(dot)com
Hi Tammy!!
I want to know what fabric did you use for the pincushion.
I just begin my sewing classes and I like to make one like that, It's so cute!
Thanks
Hi Martha!
I just used a scrap that I had in my fabric bin, it was something I'd had for quite a few years.
Any tips on how to sew the hole shut after stuffing tightly? I would like to try one, but need to know how you did that? Thank you for sharing...I am excited about trying one.
LindyLou, try this tutorial for sewing the opening shut: http://keyka.typepad.com/my_weblog/2008/11/how-to-slip-stitch-a-seam-closed.html
That's the method I use when slip stitching an opening shut, hope that helps! :)
Thank you for all of your help, Tammy...you are a blessing!
Happy Thanksgiving to you and your family,
Linda
This is cute as can be. Any tips for sewing on the button since there isn't access to the back side?
To sew the button on, you do want to go through the whole pin cushion - it helps the button stay firmly in place. You can hide the knot by starting the needle where the button will be sewn.
Tammy, I love your blogg! Thank you for the pin cushion,I made it yesterday and it turned out so cute!
Hiya,
Am a daughter of the King of Kings and Lord of Lords too! Thanks for the post, have been looking for a very simple pin cushion to make with my daughter - this is just right! thanks for sharing.
What a great idea! Thanks for osting this tutorial. One question though: how do you keep the point on the bottom where all the embroidery floss crosses (in the center of the bottom) perfect like that?
As you're stitching with the embroidery thread, you are bringing your needle up through the same spot each time. It goes UP from the bottom, wrap the thread from the top to the bottom and then go UP again.
Post a Comment